Quantcast
Channel: Cadimage Blog
Viewing all 1216 articles
Browse latest View live

What determines whether a material is transparent in Elevation?

$
0
0

You will notice several different Glass materials in standard ArchiCAD

For example Glass Clear appears transparent in 3D and Elevation (when transparency is turned on)

But Glass-Blue is semi-transparent in 3D and not transparent in Elevation, yet Glass Dark is

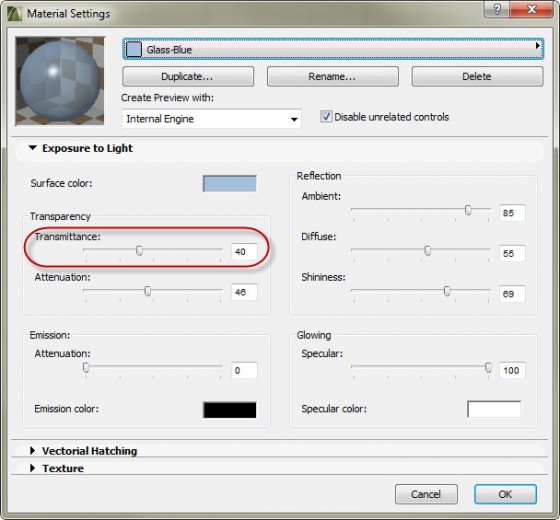
The setting that controls this is actually the Transmittance value of the material

You can access this setting in Options>Element Attributes>Material

Select Glass clear and Glass-Blue and see how the Transmittance value changes

If you want something to be transparent in Elevation it has to be set over 50


ArchiCAD Stairs not recognised in Solibri

$
0
0

If you are running BIM Validation checking in Solibri and your Stairs are being reported as having No Construction Type check your IFC properties in ArchiCAD.

In the Tags and Categories > IFC properties You can define the ShapeType e.g. Straight Run.


Alternative ways to select the arrow tool

$
0
0

When you are on a tool you will need to hold down the shift key to select an item, this temporarily turns on the Arrow tool

You may often find yourself using the shift quite often and may want it continuosly on

If you no longer need to use the tool you were previously on hitting Esc will default to arrow

However if you want to use it again use the ‘W’ key to select the arrow tool & it will remain on

Now if you hit ‘W’ again it will go back to the last tool you had selected

To see the top 12 useful commands check out this Wiki article: http://www.archicadwiki.com/TopCommands

Setting your roof Spring point

$
0
0

When setting up your roof, make sure that you put your spring /pivot point in the right place for the type of roof that you use. Especially if you have strict boundary requirements.

In the image below, we are using a trussed roof.  There for the roof needs to pivot / spring from the outside face of the wall


Yet in the next image, where we are using a raftered type of roof construction, we have to set the spring point  from where the rafter makes the first connection with the top plate of the wall frame


This may not seem that important, but in some cases it can be the difference between getting or not getting a permit


The Electrical schedules have been updated and improved

$
0
0

We noticed that the interactive schedule criteria for the Electrical schedules & legends wasnt being remembered fully when exported

The reason for this was part of the criteria included mention of the Electrical tool which isnt a standard tool

So we have updated it now use only standard ArchiCAD terms to display all items associated with your Electrical plan including the Cadimage Electrical tool components

This is included in the new release of Electrical, simply download & install to receive the updated schedules

Keeping track of changes

$
0
0

All projects change, clients changing their minds etc,  We all know this happens, There is generally no way to avoid it.  The good folks at Graphisoft are aware of this and have built in a handy little notebook for you.

This can be accessed from File>Info>Project Info…


A notepad will pop up with date and time information.  So that you can note down exactly what time the client decided to make the proverbial “Small Change

Place a Wall Plate on a Cabinet

$
0
0

If you place a Cadimage Electrical wall plate near a wall, it will snap to the wall. Usually this is extremely helpful, but in some cases you may not want this to happen. For example, you might want to place the wall place on a cabinet.

Aargh! The silly wall plate insists on sticking to the wall!

Don’t panic. There’s a way to stop this happening.

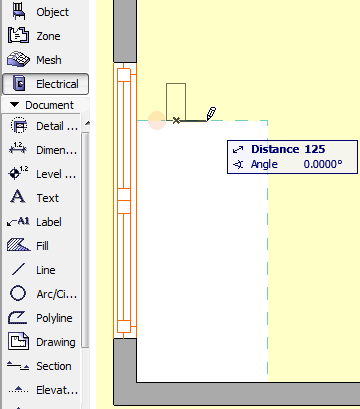
Before placing the wall plate, turn off the Align to Wall control in the Info Box.

Click to indicate the position of the wall plate.

Click again to indicate it’s orientation.

Ceiling Fan

$
0
0

Need a ceiling fan for your electrical layouts? A quick search of the online objects will reveal that a number of free ceiling fan objects are currently available.

Double-click on the Object tool in the ArchiCAD toolbox.

In the Search field type ceiling fan, and choose On BIM Components Portal.

Choose one of the fans, then download and embed it into your project.

Each fan has a customizable 2D symbol and 3D model.


Patterson Associates : Geyser

$
0
0

There’s a nice piece on Architecture Now, about the Geyser building in Parnell, designed by Patterson Associates.

Read the Article here. I highly recommend viewing the Gallery too.

Geyser, as seen from Parnell Rise.

Match Hip and Ridge Flashings

$
0
0

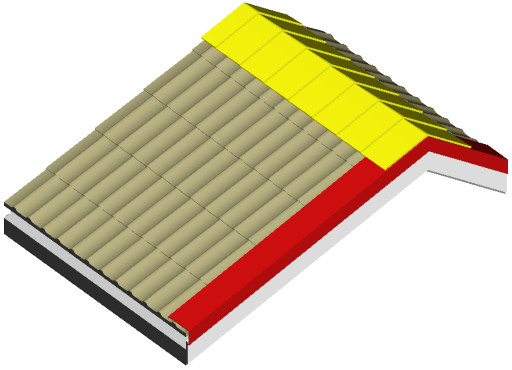
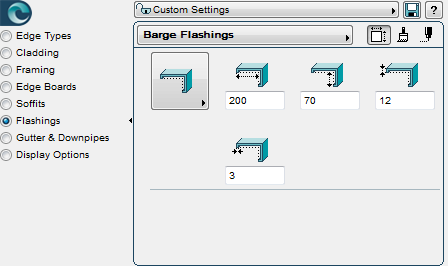
The Cadimage Roof Covering can add profiled claddings, gutters + downpipes, soffits, edge boards and flashings to an ArchiCAD roof. Sometimes you may want the ridge and barge flashings to differ (say a tiled hip with a folded metal ridge flashing). At other times you may want the rib and hip flashings to match (both tiled or both folded steel).

There’s one way to match the barge and ridge flashings that is quick, easy, and produces a tidy result. There’s another way to do it that is slow, awkward, and produces a messy result.

Both methods are described below.

It is assumed that the Barge Flashing has been already set up as you want it.

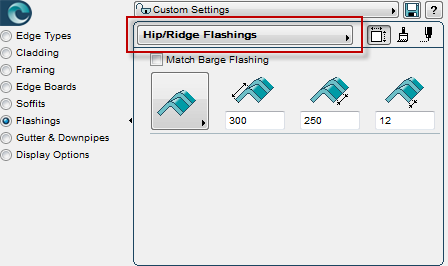
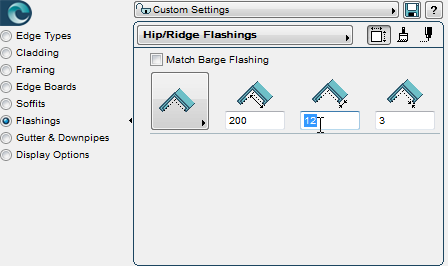
Go to the Flashings page, and choose Hip/Ridge Flashings from the list at the top of the dialog.

Quick and Tidy

This is a one-step process that produces a good, clean model.

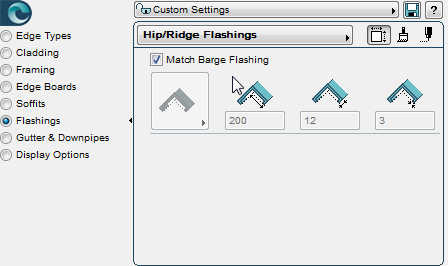
Simply click the Match Barge Flashing checkbox.

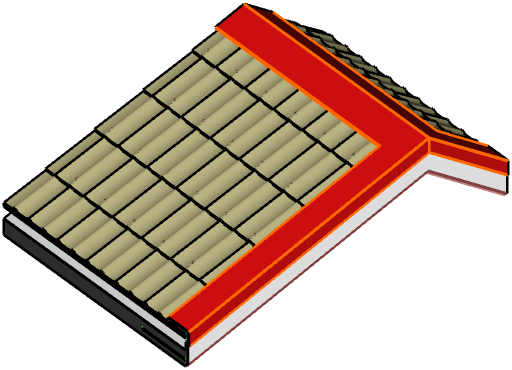
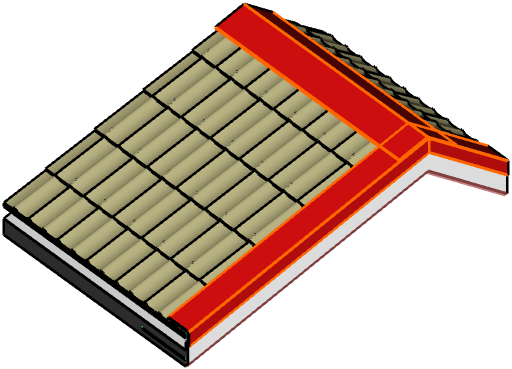
The result is that the edge flashings match. I’ve left the outlines visible in the illustration so you can see how tidy the flashing junctions are.

Slow and Messy

This is a memory-intensive, multiple data entry approach that results in untidy linework in 3D.

Manually copy each of the settings from the Barge Flashing to the Hip/Ridge Flashing.

The resulting model is OK but if you look at the outlines you will shudder to see that they pass through each other at the junction. It looks even worse if you selected a profiled (i.e. not flat) flashing.

Shortcuts you didnt know about…

$
0
0

When ArchiCAD was first done a lot of the shortcuts used in Wordpad would work in ArchiCAD

This has changed over time but a some of them still do, here are some which come in handy

CTRL+Backspace     –     deletes the entire word instead of just one character

CTRL+5      -     another way of doing Select all

CTRL+HOME    -     moves cursor to start of text instead of start of line

CTRL+END     –     moves cursor to end of text, instead of end of line


Control what you see in your trace reference

$
0
0

Did you know you can turn off certain elements when using Trace Reference

By default some items like dimensions are turned off so the same process can be used to turn them on

To do this activate the Trace Reference palette by going to Windows Palettes>Trace & Reference

Then click the right arrow beside the Reference, there you can choose what you do & dont want to show:

Some shortkeys that are free to add your own

$
0
0

As a way to improve producitivity there are some useful ways to quickly complete tasks

Shortkeys is the obvious choice, but dont you wish there was some shortkeys for the functions you use most

Heres a list of keys that arent being used in the standard template that are up for grabs

The letters I J K L P S U V are not assigned to anything

And usual combinations like Shift+W (handy with your left hand is also free to use)

To set them go to Options>Work Environment>Keyboard Shortcuts

Find the menu item you want to add a shortkey to then simply hit the shortkey and click Assign:


Happy Holidays from Cadimage

$
0
0

Thanks everyone for your support this year!

As you might expect, we’ll be shutting down over the Christmas break – the office will be closing on the 21st of December until the 7th of January. For that first week, we’ll be running a Skeleton Staff here, which isn’t as grisly as you’d think, and then we’ll be mostly back up to full volume on the 14th.

And for those of you still working, we just released a new free Holly Wreath object for ArchiCAD. It’s the perfect thing to make your model more festive! Download it here.

And if you didn’t already grab it last year, you can also grab the whole pack of free Christmas objects here. It includes stars, presents, a Christmas tree and trimmings, and the Holly Wreath now as well.

Merry Christmas!

Remember the Forum and help each other during the holidays

$
0
0

The Cadimage office will be closed over the christmas holidays

If you do have any issues have a look through our Forum to see if these have been covered before:

http://helpdesk.cadimage.com/forums

There are tonnes or articles in there already covering hundreds of issues

We would like our customers to use this space for their own use, so if you see an issue you have encountered before help each other

Feel free to create new topics and subscribe to ones you feel you can help with, if you have any suggestions how we can improve it let us know

A community is much stronger than the sum of the individuals, so help each other out & have a great Christmas!


How to offset components of a wall plate

$
0
0

Sometimes there may not be enough room along a wall to fit all of the components:

So instead of stacking them side by side you can offset them from a  wall as well

Simple select the components you want to offset and go to position settings

Set the distance you want to offset and you can now arrange them in a smaller area:

Java – useful information

$
0
0

ArchiCAD relies heavily on Java, it is installed with the disc, this version is the one that Graphisoft have extensively tested and is certified ‘compatible’
You can also find these versions here: http://www.archicadwiki.com/Install/Java

Sometimes when installing the latest version of Java some compatibility issues can occur

It is recommended that you remain on the compatible version to ensure there are no issues

This also applies to updating your keyplug – when trying to use https://upgrade.graphisoft.com/ to update your ArchiCAD license ensure you have the compatible version installed
You will also need to allow Java to run on that webpage, notifications should pop up giving you the option to ‘Run this time’

Back to work

$
0
0

Hope everyone had a great holiday!  Time to return to work

The Cadimage office is now back in full swing after last week with only a few staff

We are working our way through support but we are now available to respond to any inquiries in a timely manner

Acquisition of Encina and formation of Cadimage UK Limited

$
0
0

Press Release

Auckland, New Zealand and Bristol, United Kingdom, Monday January 14th 2013. Cadimage Group Limited of Auckland, New Zealand, today announces the acquisition of Encina and the formation of Cadimage UK Limited.

Cadimage Group has acquired all the assets of Encina Limited and Cadimage UK has been formed to continue the work that has been conducted by Encina over the last 10 years. Ralph Wessel has joined Cadimage UK and will continue to work actively as a key member of the Cadimage Group team as the new Head of Development.

“Through the acquisition of Encina we have expanded our product range but also, and more importantly, our overall development team, capabilities and systems,” says Campbell Yule, CEO and Managing Director of the Cadimage Group and the newly formed Cadimage UK Ltd. “This is an exciting time for Cadimage Group as we expand our operations into the United Kingdom and the acquisition of Encina certainly strengthens our development expertise and also provides a platform to support our European customers.”

Campbell continues: “We are especially pleased to have Ralph on-board. I have known and worked with Ralph for over 16 years and look forward to having him as part of our team.”

Over the last 10 years Encina Limited has built up a strong reputation for innovative and robust software delivery coupled with strong customer support. Its portfolio extends from the widely applicable modeling toolset in OBJECTiVE, to custom applications for larger architectural firms to design, price and deliver architectural projects.

Ralph notes, “Our shared commitment to design, quality and customer support, coupled with a working relationship spanning many years, made this an easy step to take. The combination of our key strengths will enable us to achieve great things in the years ahead. I’m thrilled to be working with Campbell and the fantastic team he has assembled at Cadimage.”

About Cadimage Group:

Cadimage Group distributes, develops and supports a range of design and performance-evaluating software for architects, engineers and construction companies that enhance design capability and reduce risk and cost. For additional information about Cadimage Group Limited, please visit http://www.cadimagegroup.com
Remove Labels from Electrical Symbols
$
0
0

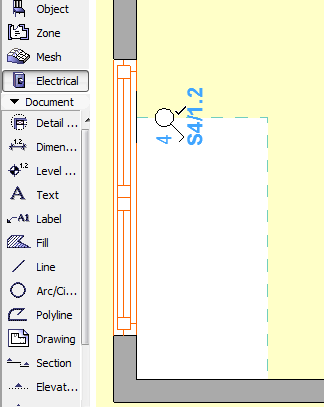
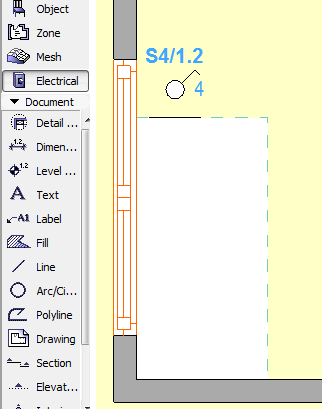
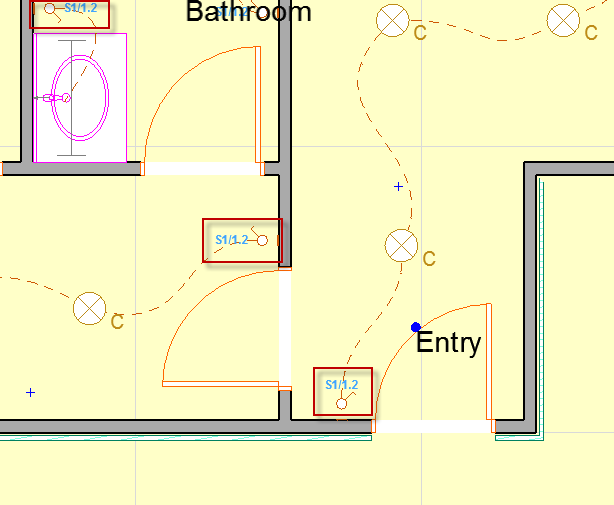
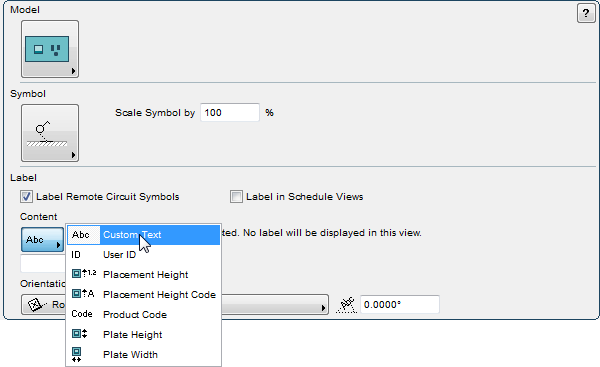
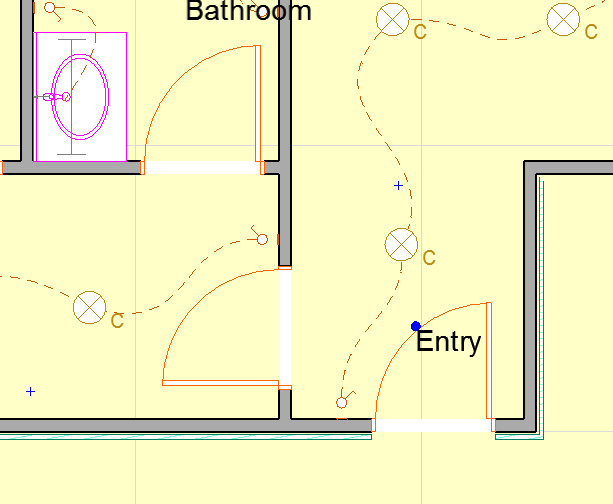
When you first install the Cadimage Electrical tool, wall plate and component symbols that you place in the project will display a label. For wall plates, the label shows the product code and a code for the fixing height. For components, only the fixing height is displayed. The label forms an integral part of the 2D symbol, however you can remove the label for any view.

ELE_Remove_Label_06

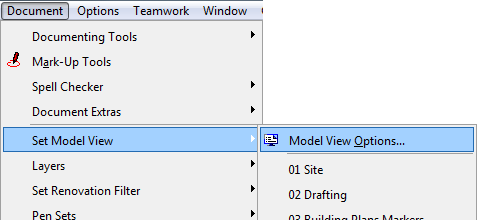
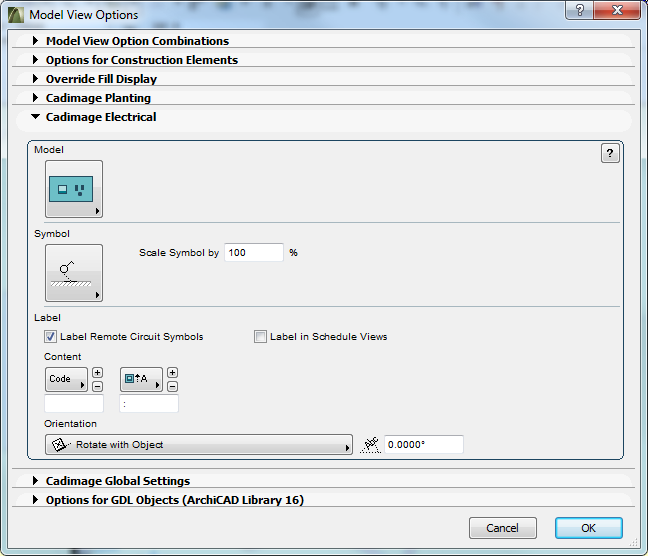
From the Document menu, choose Set Model View > Model View Options … to bring up the Model View Options dialog.
ELE_Remove_Label_01

Open the Cadimage Electrical section of the dialog.

ELE_Remove_Label_02

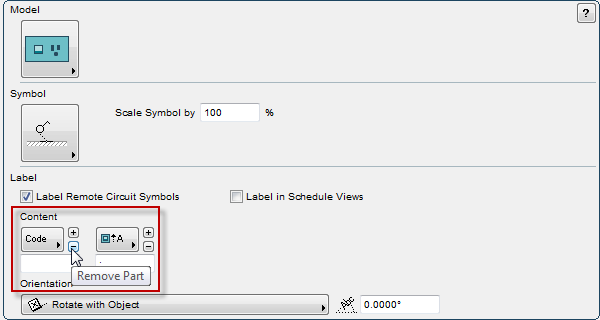
To remove the labels for the current view, click on the ‘-’ button under Label > Content.

ELE_Remove_Label_03

The label part will be deleted.

ELE_Remove_Label_04

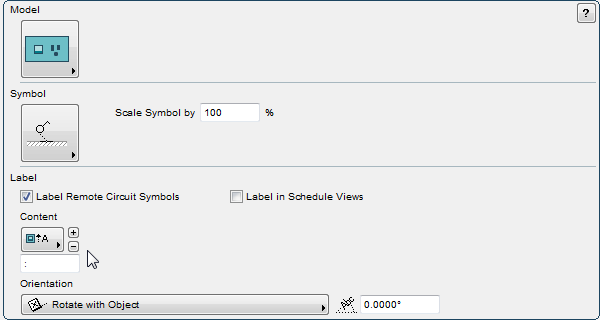
Continue to click on the ‘-’ button repeatedly until only one label part remains.

Now set the remaining part to Custom Text, and clear the contents of the input field.

ELE_Remove_Label_05

The labels will be removed from all the electrical symbols.

ELE_Remove_Label_07

You can apply these settings to ArchiCAD views just as you would for any of the Model View Option settings.

Viewing all 1216 articles
Browse latest View live